- Sign in to Vertex as an Administrator, and in the upper-right corner, click your initials, and choose Admin Settings. If you don’t see Admin Settings, this means you’re not an Administrator.
- Click Settings in the left navigation
- Select the Security tab and Add Identity Provider
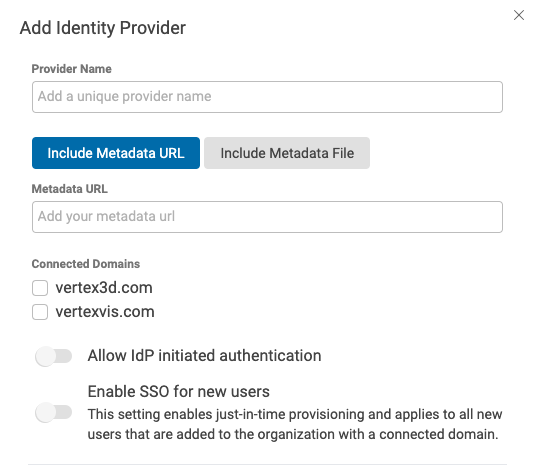
- In the Add Identity Provider dialog, enter the following:
-
- Provider Name
- This can be any name but we recommend prefixing it with your company name or something unique as this name must be globally unique within Vertex.
- Metadata URL/File
- This will be provided by your Identity Provider. Recommend using the URL option if possible to allow dynamic updates.
- Connected Domains
- Select all domains you wish to use as SSO integrated domains.
- Allow IdP initatiated authentication
- Allow users to initiate authentication requests from the enterprise identity provider such as Okta, Azure AD, etc. Leaving this disabled will require users to initiate authentication from the Vertex login page by providing their email address.
- Enabling this option will add a Default Relay State value that must be populated in the identity provider.
- Enable SSO for new users
- All new users will be created with SSO enabled and will not have a password set. This setting will also enable Just-In-Time (JIT) user provisioning from the enterprise identity provider. If a user does not already exist in Vertex, an account will automatically be provisioned when the users accesses Vertex from the identity provider. By default users will be created as Connect Users.
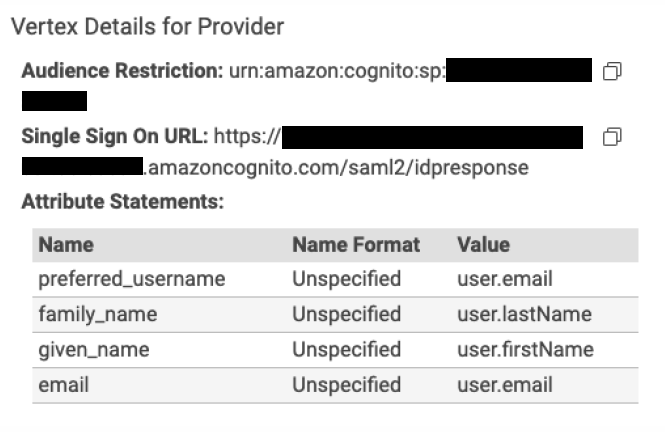
- Vertex Details for Provider
- The following details are required to be entered in the identity provider. See identity provider specific examples for more detailed examples.
- Provider Name
Identity Provider Examples
- Okta
- Create a new SAML application integration as an Okta administrator
- Populate the Single sign-on URL with the Single Sign On URL provided in Vertex
- Populate the Audience URI with the Audience Restriction provided in Vertex
- Populate the Default RelayState with the Default Relay State provided in Vertex if IdP initiated login and automated user provisioning are planned to be used.
- Set the Name ID format to EmailAddress
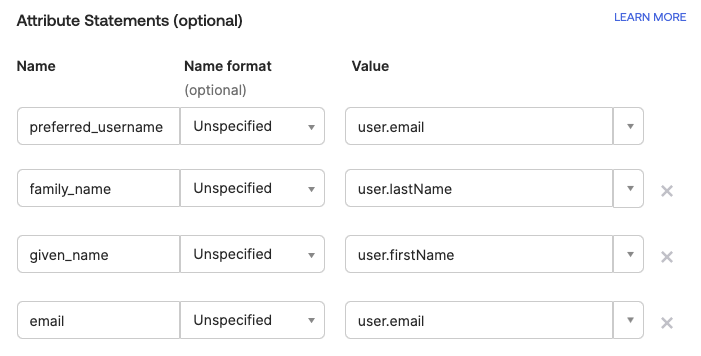
- Define the attributes required as specified above.
- Finish the application creation and copy the Metadata URL provided or download the XML
- Paste the Metadata URL or upload the XML in Vertex
- Azure AD / Entra
- Create new enterprise application as a custom application
- Select Integrate any other application you don't find in the gallery (Non-gallery)
- Set up single sign on > SAML
- Edit the Basic SAML Configuration
- Populate the Identifier (Entity ID) with the Audience Restriction provided in Vertex
- Populate the Reply URL (Assertion Consumer Service URL) with the Single Sign On URL provided in Vertex
- Populate the Relay State with the Default Relay State provided in Vertex if IdP initiated login and automated user provisioning are planned to be used.
- Edit the Attributes & Claims
- Create the following attribute mappings. Remove the namespace and leave it blank.
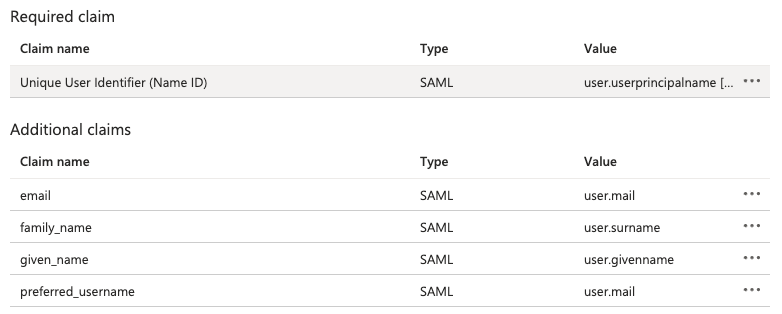
- Create the following attribute mappings. Remove the namespace and leave it blank.
- Copy the App Federation Metadata URL or download the XML
- Paste the Metadata URL or upload the XML in Vertex.